
I cherish a pair of older furniture items with laminate finishes, but over time, they’ve dulled a bit. Rather than replacing them, I’m curious if it’s feasible to give them a fresh look through painting. Any insights or suggestions would be appreciated!
– Monica Matthew, Cochin
Transforming the process of painting laminated furniture into a comprehensive guide, rich with detail, requires expanding on each step while also providing additional insights, tips, and variations. Let’s delve into a thorough exploration of how to successfully paint laminated furniture.
Revitalizing Laminated Furniture: An In-Depth Exploration of Painting Laminate Surfaces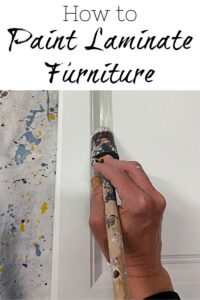
Laminate furniture, characterized by its sleek, non-porous exterior, often presents a unique set of challenges when it comes to painting. Despite its seemingly amenable appearance for a fresh coat of paint, many DIY enthusiasts find themselves grappling with issues such as bubbling, poor adhesion, or uneven coverage. However, with a strategic approach and meticulous preparation, transforming your laminated pieces into eye-catching focal points of your decor is entirely achievable. In this comprehensive guide, we will meticulously navigate through each step of the painting process, offering detailed instructions and expert tips to ensure your project yields professional-quality results.
Understanding the Challenges Inherent in Laminate Surfaces
Before delving into the intricacies of the painting process, it’s crucial to comprehend why laminated furniture poses distinct challenges. Unlike natural wood or other porous surfaces, laminate is engineered to resist moisture, scratches, and stains. Its smooth finish and synthetic composition inherently make it less receptive to conventional painting techniques. Without meticulous preparation, paint may struggle to adhere to the surface, leading to unsightly issues like bubbling, peeling, or uneven coverage. Overcoming these obstacles and achieving a flawless finish demands careful planning and execution.
Preparing the Surface for Painting
The cornerstone of successful laminate painting lies in comprehensive surface preparation. Initiate the process by clearing the furniture of any dust, dirt, or debris that could impede paint adhesion. A dry cloth is ideal for the initial removal of surface particles, followed by a water-dampened soft cloth to eliminate any remaining residue. Particular attention should be given to hard-to-reach areas, including crevices and undersurfaces, to ensure every inch of the furniture is immaculately clean and ready for painting. In cases of stubborn stains or grease buildup, a solution of vinegar and water can be highly effective in dissolving and lifting away contaminants, leaving the surface pristine and optimally prepared for subsequent steps.
Choosing the Right Paint and Primer
Selecting the appropriate paint and primer is a critical step in ensuring the success of your laminate painting project. Given the unique characteristics of laminate surfaces, it’s imperative to choose products specifically formulated for non-porous materials. Oil-based or shellac-based primers are often recommended, as they provide excellent adhesion to smooth surfaces and create a strong foundation for the paint to adhere. Additionally, consider opting for high-quality acrylic or oil-based paints designed for use on non-porous materials. These paints offer durability and resistance to wear, ensuring that your newly painted laminate furniture maintains its aesthetic appeal over time.
Testing and Assessing Adhesion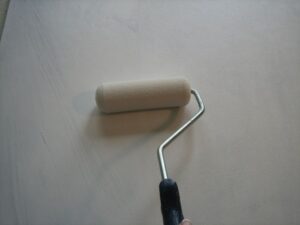
Before committing to painting the entire piece, it’s prudent to conduct a small-scale adhesion test on an inconspicuous area. Apply a small amount of primer and paint to the selected test area and allow it to dry thoroughly. Once dry, assess the adhesion by attempting to scratch or peel the paint. This test provides valuable insights into the compatibility of the chosen primer and paint with the laminate surface, allowing you to make any necessary adjustments before proceeding with the entire project. If the adhesion test proves successful, you can proceed with confidence, knowing that the chosen products are well-suited to the unique characteristics of laminate.
Surface Sanding and Deglossing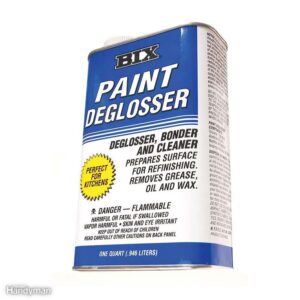
To further enhance adhesion, lightly sanding the laminate surface is a crucial step in the preparation process. Use fine-grit sandpaper to scuff the surface gently, creating a textured surface that promotes better paint adherence. Be cautious not to sand too aggressively, as excessive abrasion can compromise the integrity of the laminate. After sanding, thoroughly clean the surface to remove any dust or particles generated during the sanding process.
In addition to sanding, deglossing the laminate surface is recommended to eliminate the glossy finish that can impede paint adhesion. A liquid deglosser or a mixture of water and trisodium phosphate (TSP) can be applied to the surface, breaking down the glossy layer and creating a more suitable surface for paint application. Ensure to follow the manufacturer’s instructions for the chosen deglossing product and thoroughly rinse the surface afterward to remove any residue.
Priming the Laminate Surface
Priming is a pivotal step in the painting process, especially when dealing with non-porous surfaces like laminate. Apply a thin, even coat of the selected primer using a high-quality synthetic brush or a foam roller designed for smooth surfaces. Take care to avoid leaving brush marks or roller streaks, as these can affect the final appearance of the paint. Allow the primer to dry completely according to the manufacturer’s recommendations before proceeding to the next steps. Sanding is perhaps the most critical step in preparing laminate surfaces for paint. Despite common misconceptions, sanding does not have to be aggressive or damaging to the furniture. Instead, it serves to “roughen up” the smooth laminate, creating micro-texture that promotes primer and paint adhesion. Select a fine-grit sandpaper suitable for laminate surfaces and lightly sand each area in a uniform manner. Avoid excessive pressure or over-sanding, as this can compromise the integrity of the laminate and expose underlying particle board. The goal is to achieve a slight roughness without compromising the laminate’s integrity, ensuring optimal paint adherence without risking damage to the furniture. Once sanding is complete, thoroughly remove any sanding dust to create a clean, smooth surface for priming.
Choosing the Right Technique for Painting Laminate
When it comes to painting laminate furniture, the application technique is crucial to achieving a professional-looking finish. Opt for a high-quality synthetic brush or a foam roller designed for smooth surfaces, as these tools minimize the risk of brush marks or roller streaks. Additionally, consider using a paint sprayer for large surfaces, as this can provide a more even and consistent finish.
Apply the selected paint in thin, even coats, allowing each coat to dry completely before applying the next. Multiple thin coats are preferable to a single thick coat, as they help prevent issues like dripping, sagging, or uneven coverage. Pay close attention to the drying times recommended by the paint manufacturer, as premature recoating can compromise the finish. Priming is a crucial preparatory step that enhances paint adhesion and promotes long-term durability. When selecting a primer for laminate surfaces, prioritize products specifically formulated for adhesion, as these are designed to bond securely to smooth, non-porous materials. Apply the primer evenly in smooth, thin coats, using a high-quality brush or foam roller for optimal coverage. Allow each coat to dry completely before applying subsequent layers, ensuring thorough coverage and a uniform surface texture. Depending on the desired finish and paint color, multiple coats of primer may be necessary to achieve the desired results. Be patient and allow ample drying time between coats, as rushing this step can compromise the integrity of the primer and affect the final paint finish
Finishing Touches: Sealing and Protecting
Once the final coat of paint has dried thoroughly, consider applying a clear sealer or topcoat to enhance durability and protect the painted surface. Choose a product specifically designed for use on furniture and follow the manufacturer’s instructions for application. The sealer will not only protect the paint but also provide a smooth and easy-to-clean surface.
Additional Tips for Success
- Ensure proper ventilation in the painting area to promote faster drying and minimize the inhalation of fumes.
- Work in a dust-free environment to prevent particles from settling on the wet paint.
- Allow sufficient drying time between each coat to achieve optimal results.
- Consider using painter’s tape to protect areas that should not be painted, such as hardware or edges.
- Experiment with paint colors and finishes to achieve the desired aesthetic for your furniture.
Disassembly for Accessibility
While not always feasible, disassembling laminated furniture pieces can greatly facilitate the painting process. By separating individual components, such as drawers, doors, or panels, you gain better access to tight spaces and intricate details. This not only simplifies sanding and priming but also minimizes the risk of drips or uneven coverage during painting. If disassembly is an option, carefully label each part to ensure proper reassembly later and proceed to the next step with confidence.
Painting with Precision
With proper preparation complete, it’s time to unleash your creativity and add a splash of color to your laminated furniture. When choosing paint for laminate surfaces, opt for high-quality acrylic or latex paints designed for use on non-porous materials. Select colors that complement your décor and personal style, whether it’s subtle neutrals, vibrant hues, or trendy pastels. Using an angled brush or disposable foam roller, apply the paint in smooth, even strokes, ensuring thorough coverage and minimal brush marks. Take care to reach all surfaces, including edges, corners, and intricate details, for a professional-quality finish. For optimal results, apply multiple thin coats of paint, allowing each layer to dry completely before proceeding to the next. This gradual approach ensures even coverage, vibrant color saturation, and enhanced durability for your painted laminate furniture.
Transforming Laminated Furniture with Paint
In conclusion, painting laminated furniture requires meticulous preparation, patience, and attention to detail. By following the steps outlined in this comprehensive guide, you can overcome the unique challenges posed by laminate surfaces and achieve stunning, long-lasting results. From thorough surface cleaning and strategic disassembly to gentle sanding, priming, and precise painting, each step plays a crucial role in transforming your furniture into a personalized masterpiece. Whether you’re refreshing outdated pieces or unleashing your creativity with bold new colors, embrace the process with confidence and enjoy the satisfaction of revitalizing your living space one brushstroke at a time.